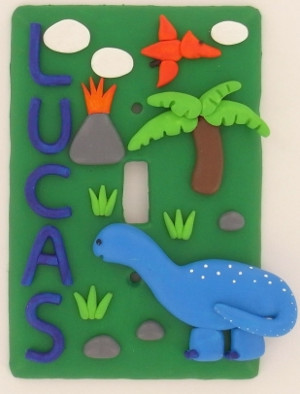
Sculpey Dino Light Switch Cover
Enter the world of the extinct every time you turn your light on or off. Dinosaur crafts for kids are so fun, and they give you a chance to explore the past. Personalize your room with the awesome Sculpey Dino Light Switch Cover, and you'll be surrounded by the mysterious creatures from billions of years ago. This is a great craft to do with your dad or grandpa. You will have the best time sculpting your new friends with this project from Polyform. Be sure to remember the secrets they tell you so that you can tell the rest of us!

Materials:
Original Sculpey®: Original White -- 1 block
Sculpey Acrylic Roller
Tool Set
Light Switch Plate
Acrylic Paint- Assorted Colors
Clear Fast Dry Glue
Tips:
- Do not use unbaked clay on unprotected furniture or finished surfaces. Start with clean hands and work surface area. Good work surfaces include wax paper, metal baking sheet, or disposable foil. Knead clay until soft and smooth. For best results, clean your hands in between colors. Shape clay, pressing pieces together firmly. Bake on oven-proof glass or metal surface at 275 °F (130 °C) for 15 minutes per 1/4” (6 mm) thickness. For best baking results, use an oven thermometer. DO NOT USE MICROWAVE OVEN. DO NOT EXCEED THE ABOVE TEMPERATURE OR RECOMMENDED BAKING TIME. Wash hands after use. Baking should be completed by an adult.
- Begin by preheating oven to 275 °F (130 °C). Test temperature with oven thermometer for perfectly cured clay. For best results, condition all clay before using.
Instructions:
-
Using the Sculpey Acrylic Roller, roll out a thin sheet of clay. Place the light switch cover on top of the sheet. Using the craft knife, trace around the edge of the switch plate leaving a little bit of clay to overhang (this will ensure that there is enough clay to wrap around the sides of the plate). Next, cut out the center switch opening. Use the pointed tip on the tool to press through the screw holes.

-
To make the Brontosaurus, create a flattened tear drop shape for the body; pull from the rounded end to create the head and neck and from the pointed end to form the tail.
-
Make two short logs for the legs.
-
Create four small balls for the toes and one for the eye.
-
Using the plastic modeling tool, draw a mouth into the face.

-
To make the Pterodactyl, create two flattened tear drop shapes, one for the body and one for the head. Make the head slightly pointy and press a mouth into it.
-
Make two smaller flattened tear drop shapes for the wings.
-
Make one tiny ball for the eye.
-
Create one short snake for the foot.

-
To make the Palm Tree, create one log for the trunk.
-
Make four long tear drop shapes for the leaves. Press into bottom of leaf to create the palm indents.

-
To make the grass, create several thin tear drop shapes and press together to form a cluster. Make as many as you would like to have.
-
To make the rocks, create some flattened ovals. Using your finger and push slightly out from the top of the rock to give an irregular shape.
-
To make the clouds, create flattened ovals.

-
To make the volcano, create one triangle shape; slightly flatten the top.
-
Make one flattened crown shape for the top.

-
To make the name, roll out a snake of clay, and cut appropriate pieces for the name.

-
Bake the pieces according the manufacturer’s instructions, and let cool.
-
Use acrylic paint to paint all the pieces and let dry.
- Use the clear fast dry glue to assemble the pieces. Once all of your creatures and shapes are dry, you can then glue them to the switch plate.
Read NextKool Aid Play Dough

