Sunny Clay Puzzle
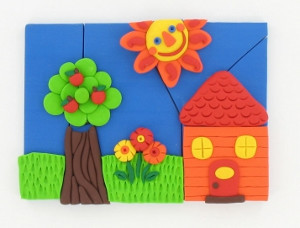
Have a sunny day when you make a puzzle out of clay. The Sunny Clay Puzzle is a really awesome kids' craft that can be played with for years to come. Because you're crafting with clay, it's like you're making a 3D puzzle; pretty neat! This art project would make a wonderful gift for your grandparents. Wrap each piece individually and see if Grandpa can put it into one piece. You'll love knowing the solution and watching as adults struggle to solve it. If you master sculpting this puzzle, see if you can make a bigger one with your own design. Sculpt your day into a sunny one with this amazing craft from Polyform.

Materials:
- Sculpey® III: French Blue - 2 oz-- 3 blocks
- Sculpey® III: Yellow - 2 oz-- 1 block
- Sculpey® III: Red Hot Red - 2 oz-- 1 block
- Sculpey® III: Just Orange - 2 oz-- 1 block
- Sculpey® III: Granny Smith - 2 oz-- 1 block
- Sculpey® III: Emerald - 2 oz-- 1 block
- Sculpey Acrylic Roller
- Craft knife - Adult should use a sharp blade for cutting puzzle pieces, children can use a dull blade for sectioning clay
- 5" x 7" card stock with pattern
- Copy paper
- Scissors
Tips:
- Start with clean hands and work surface area. Good work surfaces include wax paper, metal baking sheet, or disposable foil. Knead clay until soft and smooth. For best results, clean your hands in between colors. Shape clay, pressing pieces together firmly. Bake on oven-proof glass or metal surface at 275 °F for 15 minutes per 1/4 in thickness. For best baking results, use an oven thermometer. DO NOT USE MICROWAVE OVEN. DO NOT EXCEED THE ABOVE TEMPERATURE OR RECOMMENDED BAKING TIME. Wash hands after use.
Instructions:
-
Begin by preheating oven to 275 °F. Test temperature with oven thermometer for perfectly cured clay. For best results, condition all clay by kneading until it’s soft and smooth.
-
Using the template as a guide, copy your puzzle pieces onto card stock. Cut out the outside edge of the complete puzzle.

-
Using French Blue, prepare clay slab, 1/4" thick. Place clay slab on copier paper to protect your work surface and still be able to move your puzzle around as you work on it. Using the card stock, trim the outer edge of the puzzle. Remove scraps.
-
Cut out each piece of the puzzle from the card stock. Lay them on the slab and cut out each piece as accurately as you can.

-
Lift the copier paper and puzzle into a baking pan and bake the entire puzzle for only 10 minutes to firm the top enough to work on each piece. Once baked, remove the copier paper out from under the puzzle as quickly as you can so the puzzle will cool flat.
-
Decorate one piece at a time. It's important to decorate the pieces in place, but don't let the overlapping clays touch the surrounding pieces. Protect the surrounding pieces by putting the matching card stock puzzle piece over the top of the clay piece. With the surrounding pieces covered by card stock, decorate the piece as you like. Make sure you really press the fresh clay decorations onto the exposed puzzle piece.

-
Repeat decorating pieces by covering up surrounding areas with card stock shapes and adding fresh clay to the exposed pieces. Refer to finished photo for decorating ideas. By decorating each piece in this method, you can make detailed shaped pieces (that overlap the pieces around them) without making really complicated cuts.

-
When completely done, bake the puzzle as directed above with the card stock barriers in place.
- After baking, have an adult remove card stock barriers as quickly as you can once the puzzle comes out of the oven. Allow puzzle to cool.
Read NextNo Nonsense No Bake Clay Dough

