Family Fingerprint Ornament
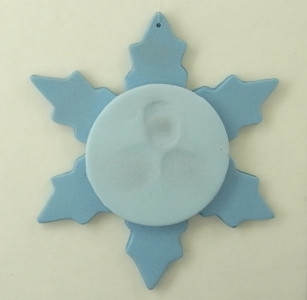
Homemade Christmas ornaments, like this Family Fingerprint Ornament, are the perfect kids' crafts for the holidays. With this ornament craft idea, your little ones will get to learn how to make Christmas ornaments with clay! Kids' projects are always better when children can use their hands to sculpt works of art that everyone will get to enjoy. What makes this craft even more special is that the whole family can join in to make an ornament that will be put on the tree every year.

Materials:
- Sculpey® III, 2 oz , Light Blue Pearl - 1 block
- Sculpey® UltraLight®, 2 oz , White - 1 block
- Sculpey® Clay Conditioning Machine
- Sculpey Clay Tool Starter Set
- Sculpey Acrylic Roller
- 1-3/4” circle cutter
- Snowflake cookie cutter approximately 4” wide
- Pearl Ex Powder in silver and interference blue
- Soft bristle paint brush
- Extra fine tip permanent marker
Instructions:
- Condition and roll out a sheet of Light Blue Pearl on the thickest setting of your Clay Conditioning Machine. Cut out the snowflake and set it to the side. You will use some of the remaining Light Blue Pearl in the next step.
- Condition equal parts UltraLight and Light Blue Pearl together; you’ll know you are done conditioning when you have a nice even light blue color. Roll out a sheet on the thickest setting of your Clay Conditioning Machine.
- Gather the family together to add their fingerprints to the clay sheet. Start with one person and have him or her press the flat end of their fingertip onto the clay sheet as close to the center as possible. Continue with each person making sure they also add their fingerprint close to the center without overlapping the other fingerprints. Once you have all of the fingerprints on the clay, place the circle cutter on the clay so it is centered over the fingerprints. Cut out the circle.

- Brush a light dusting of the Silver Pearl Ex powder into the fingerprint impressions. The dusting of powder will help define the fingerprints.

- Pick up the snowflake that you cut out in Step 1 and place it onto your work surface. Gently lift the circle that has the fingerprints on it. Rub a thin layer of Bake N’ Bond onto the backside and place it onto the middle of the snowflake. Use the paint brush to add a dusting of the Interference Blue Pearl Ex to the snowflake. The Interference Blue adds a nice glow to the snowflake. Use the needle tool to poke a hole through one of the tips of the snowflake. Bake the assembly for 20 minutes and let cool completely.
Read NextChristmas Tree Duct Tape Craft

