This project was submitted by one of our readers, just like you.
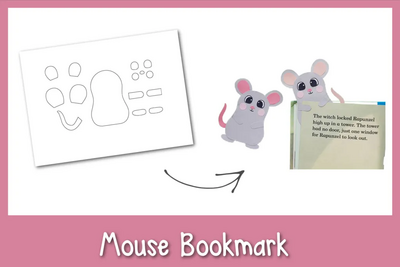
Mouse Bookmark
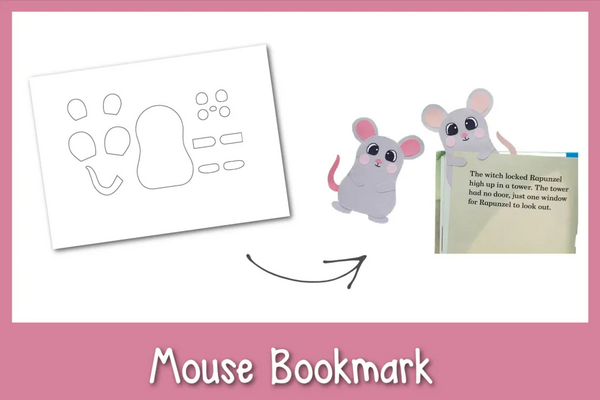
"This craft is perfect for all book lovers and animal lovers out there. This bookmark is the perfect craft to mark your place, and it can be created in a few easy steps. Parents and teachers can use this craft! All this craft needs is paper, glue, and scissors, and with a few simple steps, you can create the cutest mouse to keep or share with your friends. Print off the instructions to save for future use, and happy creating!"
Primary TechniquePaper Crafts

Materials List
- Construction paper
- Sharpie
- Glue stick
- Pencil
- Scissors
Instructions
-
Select gray and pink colored papers to trace the nose, tail, blush and inner ear patterns on the pink paper and trace the outer ear patterns, body base, lower legs and upper legs on gray colored construction paper.
-
Cut out the traced patterns nicely.
-
Attach the inner ear cutouts in the middle of the outer ear cutouts. Attach the lower legs on the bottom side of the body base.
-
Attach the ear patterns on the top side of the body base pattern.
-
Attach the nose and blush cutouts on the head part of the body base.
-
Attach the tail cutout on either side of the body base pattern.
-
Attach the eye cutouts above the nose, on the head part. Use a sharpie or gel pen to draw the mouth line of the papercraft mouse figure.
-
Apply glue along the side of the body base and attach the upper leg cutouts on the side and keep the rest of the upper leg free from glue.
-
Similarly, attach the other upper leg on the other side.
-
To use the papercraft mouse as a bookmark, you can simply slide a page under the upper legs; between the upper legs and the body base.
Read Next100+ Free Printable Crafts for Kids


