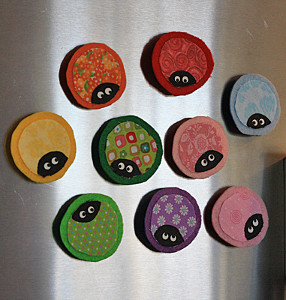
Scrappy Ladybug Magnets
Use up your scraps in the cutest way possible with these charming DIY magnets. Scrappy Ladybug Magnets are super thrifty art project ideas for little ones to make. These adorable decorative crafts are the perfect way to decorate the kitchen for spring and summer, but ladybug enthusiasts will want to leave them up all year long. If you have felt, fabric, and paper to spare, you simply have to make these scrapbuster crafts with your kids.
Materials:
- Fabric scraps
- Round plastic lid
- Felt to coordinate with your fabric
- Card stock
- Black and white craft paint
- Round magnets
- Scissors
- Pen
- Paintbrush
- Toothpick
- Glue stick
Instructions:
- Trace around the round plastic lid onto the fabric. Use scissors to cut out the circle.
- Cover the back of the fabric circle with a glue stick.

- Stick the fabric circle to coordinating felt. Glue the felt to the card stock.


- Paint a semi-circle for the head with black paint.

- Use the handle end of the paintbrush to dot on the whites of the eyes. Let everything dry completely.

- When dry, use a toothpick to dot black onto the whites of the eyes.
- Use scissors to cut around the ladybug, leaving a felt border.
- Attach a magnet to the back with white craft glue.
Your Recently Viewed Projects
Report Inappropriate Comment
Are you sure you would like to report this comment? It will be flagged for our moderators to take action.
Thank you for taking the time to improve the content on our site.

