Duck Tape Glitter Jar
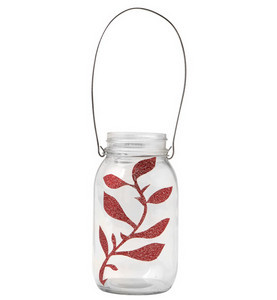
Did you think crafts with duct tape and glitter would ever go together? This mason jar craft for kids will change your mind. Add a little glamor to your home and make the Duck tape Glitter Jar. You can make ultimately any design for this mason jar craft, so you can easily personalize it to fit any holiday. With the jar's handle, you can place the Duck Tape Glitter Jar just about anywhere in your house. Want to know the best part of this easy duct tape craft? None of the mess you usually get when you craft with glitter!

Materials:
Duck Glitter®
Wire
Wire cutters
Pliers
Craft knife
Wax paper
Crafting board
Instructions:
1. Cut 2 pieces of wire, one measuring 10.5 in. long and the other 16 in. long.

2. Using pliers, bend the ends of the wire into loops. Form the 10.5 in. long piece into a circle and the larger piece into a "U" shape. You may need help from an adult with this step.

3. Thread the "U" shaped wire into the circular piece of the circular wire.

4. Place the circular piece of wire around the neck of the jar.

5. Lay out 2 pieces of Duck Glitter® tape, slightly overlapping, on a piece of wax paper.

6. Draw or trace a floral design and cut it out. This will be your template.

7. Using your template, trace your floral design onto your piece from step 5.

8. Using a craft knife, cut out your floral design.

9. Place your design on the front of your jar one piece at a time.

10. Continue until you are happy with your design.

Read NextWhimsical Flower Craft
Your Recently Viewed Projects
Sigo
Dec 11, 2017
I really like this idea because it can be changed for different occasions and is a great way to use the jars. Thanks for sharing!
Report Inappropriate Comment
Are you sure you would like to report this comment? It will be flagged for our moderators to take action.
Thank you for taking the time to improve the content on our site.

