Back to School Party
Back to school crafts for kids have never been more creative or fun. This tutorial teaches you how to make a spectacular Back to School Party that you and your friends will never forget. These clever kids' arts and crafts projects can also be used for any type of under-the-sea themed party. The best part about these fun art projects for children is that you can make as many of the details as you'd like, so don't feel pressured to crank out every piece. In fact, part of the fun is getting creative on your own and seeing what ideas you can come up with based on the tools you own.

Materials:
- Tag Lever Punch XX-Large
- Tree Lever Punch X-Large
- Round ’n Round Squeeze Punch Extra-Large
- Round 'n Round Squeeze Punch Large
- Round ’n Round Squeeze Punch Medium
- Seal of Approval Squeeze Punch Large
- Thats Amore Squeeze Punch Medium
- Boundary Waters Border Punch
- 1/8" Circle Hand Punch
- Clouds Paper Edger
- Tear Edger - Assorted Pack
- Retractable Fingertip Detail Knife
- Assorted Paper
Instructions:
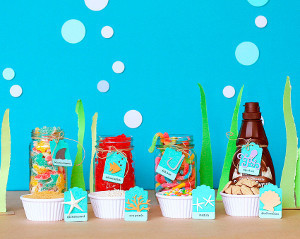
After the busy summer, it’s fun to throw a back-to-school party to reconnect with classmates. I always like to put a clever spin on any theme, so I came up with a “school” of fish concept to build a fun party around. Underwater scenes are whimsical and colorful. From there I pushed the theme further to include an ice cream bar when thinking of the phrase - too “cool” for school. For this ice cream bar, I added adorable tags to each topping putting my punches to creative use. I love getting the most from my punches by using them in unintended ways. These underwater characters can be used in many ways throughout a party, from cupcake toppers to banner decorations.

1.) This coral embellishment couldn’t be easier. Simply cut the bottom of the trunk from the Tree Lever Punch in colors such as white and orange, and you have instant, intricate coral.

2.) To make the starfish, punch an XL star and cut a small slit at each interior corner toward the center and a small snip from the end of each point. Fold in these created flaps on each star point. Place star upside-down on a mouse pad or craft foam and run a stylus from the center to end of each point. Follow this up (while still on foam) by piercing along these lines with a stick pen. Fold each star point at the embossed line for dimension.


3.) Another quicker way to make starfish is by altering the May Flowers punch. Simply snip off the three petals as shown cutting in toward center. Pierce down each star point with a stick pin on craft foam or a mouse pad.


4.) Did you know you if you cross a balloon and two butterflies, you get a fish? Crop two butterflies as shown and top with a balloon, which has the cutest fish lips built in.


5.) This fishing hook is super easy and just too cute. Simply cut around the Funky Heart as shown.


6.) Shells are easy to make from a scalloped circle, which is a punch I feel everyone should have in their craft arsenal. Using the Seal of Approval punch, mark off two scallops, skip three, and mark another two. These two sets of scallops will be chopped. From the bottom, cut up a small bit and then angle over to the side to crop. Then cut the bottom three scallops straight across as shown. You can also add dimensional lines with a stylus by placing the shell on a mouse pad or craft foam.


7.) A simple shark fin is all this tag needed, and luckily it’s easy to make by punching a circle and feeding the circle back through the punch partly to re-punch. Then snip the crescent shape in half.


8.) I was thrilled to find an easy way to make an octopus. Crop a heart as shown for the body. The legs are created by snipping off the top curl from the special edition Scroll lever punch to make them fit behind the body easier. I cropped off one of the other curls on one.


9.) I had a vision of seaweed floating up throughout the table and ice cream bar and then came up with a super easy way to make that happen. I cut pieces of chipboard (think cereal box) and used a craft knife to cut multiple slits into each. These slits were just enough to feed cardstock seaweed into to stand.

10.) The seaweed was just as easy to make by tearing assorted green cardstocks with the wave tear edger.

11.) I wanted something dramatic at the place settings since the table becomes part of the party décor. I came up with these water placemats based on a sewn, ruffled placemat I made previously. These are all cardstock. I traced my plate onto cardstock and cut out adding a 1/2" all the way around. I then traced the bottom of the plate (minus the outer lip) centered. Trim several 1 3/4" strips of blue cardstock in two shades and punch down one side of each with the Boundary Waters border punch. The special edition Washed Ashore border punch would also work well. Starting with the outer ring, pleat and hot glue the darker blue strips around the circle, lining them up with the first drawn circle (which was your plate perimeter). Repeat around with the lighter blue just outside the second drawn circle to complete. If your plate will be serving as a charge for ice cream bowls, you can hot glue the plate at the center as well.


12.) Set the stage for the party with an invitation featuring a school of fish swimming on waves created by the Boundary Waters border punch and run through the Wavy paper crimper.

13.) Here is an easy way to make bulk fish quickly. Cut a strip of cardstock using Clouds paper edgers. Flip the paper and cut the strip the opposite way being sure to line up the scallops by beginning at the same spot. Crop the fish from the strip as shown.

14.) And for one final dose of cuteness, add sideways hearts to bended straws to create fish lips. This versatile underwater party can be used for lots of different events, not only for back-to-school. See what other sea shapes you can come up with by taking a different look at your crafting tools!

Read NextMarvelous Melt-A-Cup Sculpture

