Clothespin Military Airplanes
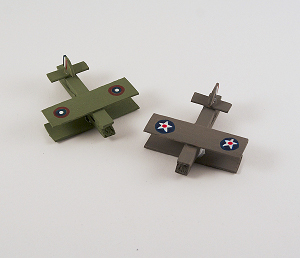
Learning how to make an airplane is a lot of fun, especially when you use materials that you never thought of using. These Clothespin Military Airplanes are some of the coolest DIY airplane crafts because this idea combines popsicle stick crafts and clothespin crafts. Your little ones won't have a chance to say that they're bored during craft time when they make these little planes. They will get to put their wonderful artistic skills to use and paint a neat design on their planes. When they're finished, they'll get to have the time of their lives playing with their homemade toys.

Materials:
- 2 Jumbo craft sticks
- 2 Miniature craft sticks
- 2 Wooden clothespins
- Paint: gray and olive green
- Paint pens: red, white, blue
- Craft knife
- Cutting mat
- Sandpaper
- Paintbrush
- White craft glue
Instructions:
- Cut the rounded ends off the jumbo craft sticks, and then cut the jumbo craft sticks in half. Cut the ends off the miniature craft sticks, and then cut the miniature craft sticks in half.


- Use your craft knife to round the end of one of the miniature craft stick halves. Repeat for the second one.

- After rounding the end, cut that piece in half, keeping only the rounded half. Repeat for the second one.

- For each airplane you should now have - wooden clothespin, two large pieces for the wings, one small piece for the horizon tail, and the rounded piece for the vertical tail.

- Sand the edges of each cut piece.

- Paint the pieces for one plane gray and the pieces for the other plane green. Use paint pens to add details to the wings and vertical tails.


- To assemble, place one of the wings upside down so that the emblems are facing downward. Add a line of white craft glue to the center of the wing. Place the clothespin into the glue.


- Place a line of white craft glue on top of the clothespin and place the second wing onto it, emblems facing up.

- Glue the horizontal tail piece to the back of the clothespin. Glue the vertical tail piece to the horizontal tail piece.

- Repeat these steps for the second plane. Allow everything to dry completely.
Read NextGlow in the Dark Bouncy Ball
Your Recently Viewed Projects
Jim Moriarty
Nov 17, 2016
These are some of the coolest crafts I've ever seen on here. Sure, the kids will play with them, but I think I might want to keep a few to myself for decoration. So neat!
Report Inappropriate Comment
Are you sure you would like to report this comment? It will be flagged for our moderators to take action.
Thank you for taking the time to improve the content on our site.

