This project was submitted by one of our readers, just like you.
Giraffe Bookmark Craft
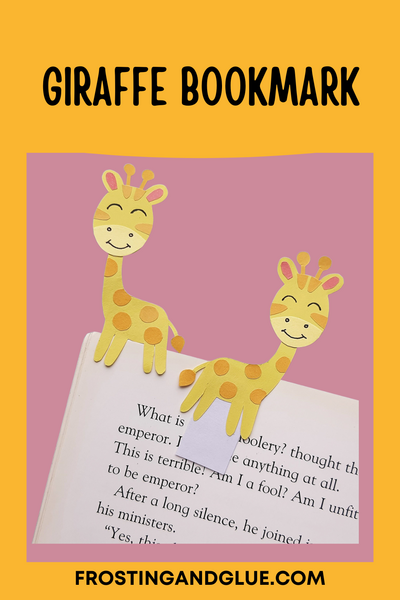
"Construction Paper Sharpie Glue Stick Pencil Scissors Select 2 different shades of yellow-colored craft papers along with orange and pink-colored craft papers. You will also need cardstock paper for the bookmark base. The template includes the body base, head, mouth part, horns, inner ears, tail, tail tip, and spots. Trace and cut out the giraffe patterns from the selected craft papers. Attach the mouth part to the lower part of the head cutout and attach the inner ear cutouts to the ear parts of the head cutout. Attach the horn cutouts on the top side of the head pattern. Attach the triangular spot cutouts on both sides and the top side of the head pattern. Use a sharpie to draw the eyes, nose, and mouth-line of the giraffe pattern. Attach the tail tip on the tip part of the tail cutout and attach the spot cutouts on the body base cutout. Attach the tail pattern on the backside of the body base pattern. Attach the head pattern with the neck part of the body base pattern. Prepare a piece of paper for the bookmark base, it should be rectangle-shaped. Attach the back side of the body part of the giraffe figure but keep do not glue the legs with the bookmark base. Now, you can simply slide a page between the bookmark base and the legs to use the giraffe as a bookmark. Tips and Tricks A new bookmark help encourage your child to read. With a fun art project like this, you can see your kid’s desire to read more. Encourage your kids to read by creating other fun DIY bookmarks throughout the whole year. Let your kids get creative as they want with this project! Let them make their giraffe however they want. Add googly eyes for fun! "
Primary TechniquePaper Crafts

Materials List
- Construction Paper
- Sharpie
- Glue Stick
- Pencil
- Scissors
Instructions
-
Select 2 different shades of yellow-colored craft papers along with orange and pink-colored craft papers. You will also need cardstock paper for the bookmark base. The template includes the body base, head, mouth part, horns, inner ears, tail, tail tip, and spots. Trace and cut out the giraffe patterns from the selected craft papers.
-
Attach the mouth part to the lower part of the head cutout and attach the inner ear cutouts to the ear parts of the head cutout.
-
Attach the horn cutouts on the top side of the head pattern.
-
Attach the triangular spot cutouts on both sides and the top side of the head pattern. Use a sharpie to draw the eyes, nose, and mouth-line of the giraffe pattern.
-
Attach the tail tip on the tip part of the tail cutout and attach the spot cutouts on the body base cutout.
-
Attach the tail pattern on the backside of the body base pattern.
-
Attach the head pattern with the neck part of the body base pattern. Prepare a piece of paper for the bookmark base, it should be rectangle-shaped.
-
Attach the back side of the body part of the giraffe figure but keep do not glue the legs with the bookmark base.
-
Now, you can simply slide a page between the bookmark base and the legs to use the giraffe as a bookmark.
Read NextPipe Cleaner Pals


