First Thanksgiving Ornament
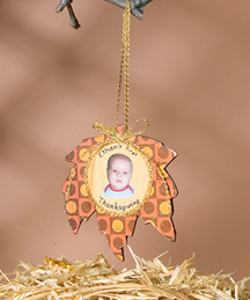
What better way to remember your baby's first Thanksgiving than by making homemade picture ornaments as a keepsake? This First Thanksgiving Ornament is a wonderful idea for moms who love to remember every single minute of their babies' lives. Memorable Thanksgiving craft ideas are always important around the holidays, and these ornaments will definitely have you remembering all of the great moments of your baby's childhood. You can even turn this fun craft into something that the family can do together every year. Everyone can join in on the fun of making a family picture ornament for each Thanksgiving.

Materials:
- FolkArt ® Acrylic Colors - Dark Brown, 2 oz.
- Mod Podge ® Sparkle, 8 oz.
- Wood leaf shape
- Flat craft brush
- Fall color plaid/patterned scrapbook paper
- 2” diameter circle cut from plain scrapbook paper
- 18” small gold braid
- Craft knife
- Hot glue gun
- Fine line permanent ink marker
- Color photocopy or print of baby
Instructions:
- Paint edges of wood ornament with Dark Brown. Let dry.
- Using the flat brush, coat the wood shape with Mod Podge. Press firmly onto the back of scrapbook paper. Let dry.
- Cut around the wood shape with craft knife.
- Coat the other side of wood shape with Mod Podge and press firmly onto the back of scrapbook paper. Let dry.
- Cut around wood shape with craft knife.
- Paint back of yellow paper circle with Mod Podge. Press into place on leaf. Use fingers to rub out air bubbles.
- Hot glue ends of gold braid to either side of leaf stem.
- Paint Mod Podge Sparkle over entire leaf ornament and hang to dry.
- Hot glue gold braid around yellow circle.
- Hot glue gold braid bow at top of circle.
- Use Mod Podge to attach baby picture in center of circle.
- Use marker to write name and message.

