Buzzing Clay Pot Bumble Bee
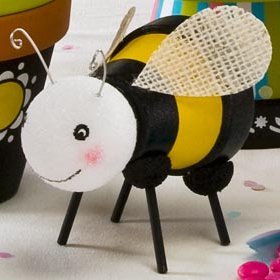
If you're looking for some bee crafts for kids, look no further than this Buzzing Clay Pot Bumble Bee. This tutorial will help your kids create a wonderful spring decoration to place in the garden, patio, or even on a shelf in your home. With some paint and creativity, your kids will turn a plain clay pot into an adorable buzzing bee. When looking for spring crafts for kids, this clay pot bumble bee is one of the best.

Materials:
- FolkArt ® Extreme Glitter™ - hologram, 2 oz.
- FolkArt ® Acrylic colors - pink, 2 oz.
- FolkArt ® Acrylic colors - medium yellow, 2 oz.
- FolkArt ® Acrylic colors - wicker white, 2 oz.
- FolkArt ® Acrylic colors - licorice, 2 oz.
- Mod Podge ® matte, 8 oz.
- Scissors
- Wire
- Wire cutters
- Twine
- Dowel rods 1/8”
- Small wooden beads
- Hot glue gun or craft glue
- Flat brush ¼”
- Stencil brush 1/8”
- Liner brush #1
- Brush basin
- Paper towels
- Foam plates
Instructions:
- Paint body of clay pots medium yellow. Using flat brush, paint bands of licorice at bottom end of pot, rim and inside.
- Apply several coats of hologram to licorice painted areas.
- Brush Mod Podge onto piece of burlap until saturated and hang to dry.
- Paint foam balls wicker white.
- Lightly stencil pink onto balls for cheeks. Create eyes by dipping opposite end of paint brush in licorice and apply dots. Let dry, repeat making dots with wicker white. Let dry then add a small dot of licorice to finish eye. Paint smile with liner brush.
- Cut lengths of wire and curl at ends. Insert into heads with glue or hot glue.
- Cut tear drop shapes from burlap for wings. Glue or hot glue to pots as shown.
- For hanging bees, before attaching head, cut a length of twine and thread one end through wood bead. Secure with knot. Thread other end through hole inside pot. Secure bead with glue. Thread other end through a second bead. Slide bead up twine until it reaches about middle of pot between wings. Secure with glue.
- Hot glue or glue head to end of pot.
- For standing bees, cut four lengths of dowel rod, making sure two of them are shorter. Paint licorice.
- Cut two 1” foam balls in half and paint licorice. Glue or hot glue two to rim off pot and two at small end of pot. Insert longer lengths of dowel rods into foam at small end of pot. Glue smaller lengths into foam on rim.
Read NextPrecious Pipe Cleaner Posy

