Hawaiian-Inspired Paper Plate Art
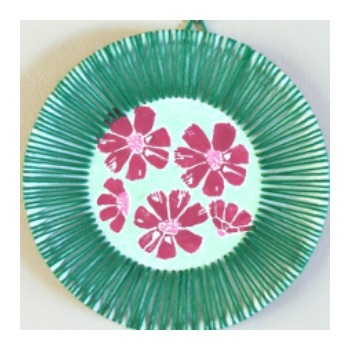
Your list of summer crafts for kids just got a whole lot more fun with this Hawaiian-Inspired Paper Plate Art. Your kids will love this new twist on their usual painting ideas. They get to take fun colored paint and create a cute stamp design that will remind them of summer sun and beach-time fun! Paper plate crafts like this one are perfect for your kids to do because they get to use a lot of different art supplies to create something artsy that everyone will get to see.

Materials:
- One 9” wide white economy paper plate
- Acrylic paint: dark pink, light pink, and light green
- Jablo’s cosmos stamps or any flower stamps you have on hand
- Three thin paintbrushes
- Leaf green yarn
- Scissors
- Chenille needle used for embroidery with wool
- Newspaper to protect the working area
Instructions:
1. Use the needle to punch a circle of evenly distributed holes all around the inner center of the plate. This step should be done by an adult.

2. Now use the Jablo’s cosmos stamps. Use one thin paint brush to apply an even layer of the sweet memories paint onto the inside of the cosmos flower. Use the second thin paint brush to apply an even layer of the plum paint onto the leaves of the flower. Be careful not to apply too much or too little paint to the stamp, as you will end up with an uneven effect.
3. Press the image onto the inner center of the plate, and then carefully lift the stamp so as not to smudge the stamped flower.

4. Repeat steps 2 and 3 with the Jablo’s cosmos stamps until the inner center of the plate has been filled with cosmos flowers.
5. Allow the stamped images to dry before continuing with the next step.
6. Use the third paintbrush and the light green paint to add a green background to the plate in-between the stamped flowers.

7. Use the yarn to make a frame around the plate:
a. Thread a piece of yarn through the eye of the needle and make a knot where the two ends of the yarn meet. Push the needle from the back through to the front. The knot will prevent the yarn from being pulled through completely.
b. Take the thread across the front of the plate towards the back and push the needle through the next hole.
c. Continue wrapping the edge of the plate until the yarn runs out. Tie another knot at the back and trim it neatly, so that it is only visible from the back.

d. Continue until the whole edge of the plate has been wrapped with the yarn.

e. Make a loop with the yarn and tie it to strands of yarn at the back of the plate and voila! You are ready to display your artwork.


